flowchart TD
    A["Capture paired footage<br/>Left camera + Right camera"]
    B["Name and identify eye files<br/>L suffix / R suffix"]
    C["Create media bins<br/>Left bin + Right bin"]
    D["Import matching clips<br/>Confirm project frame rate"]
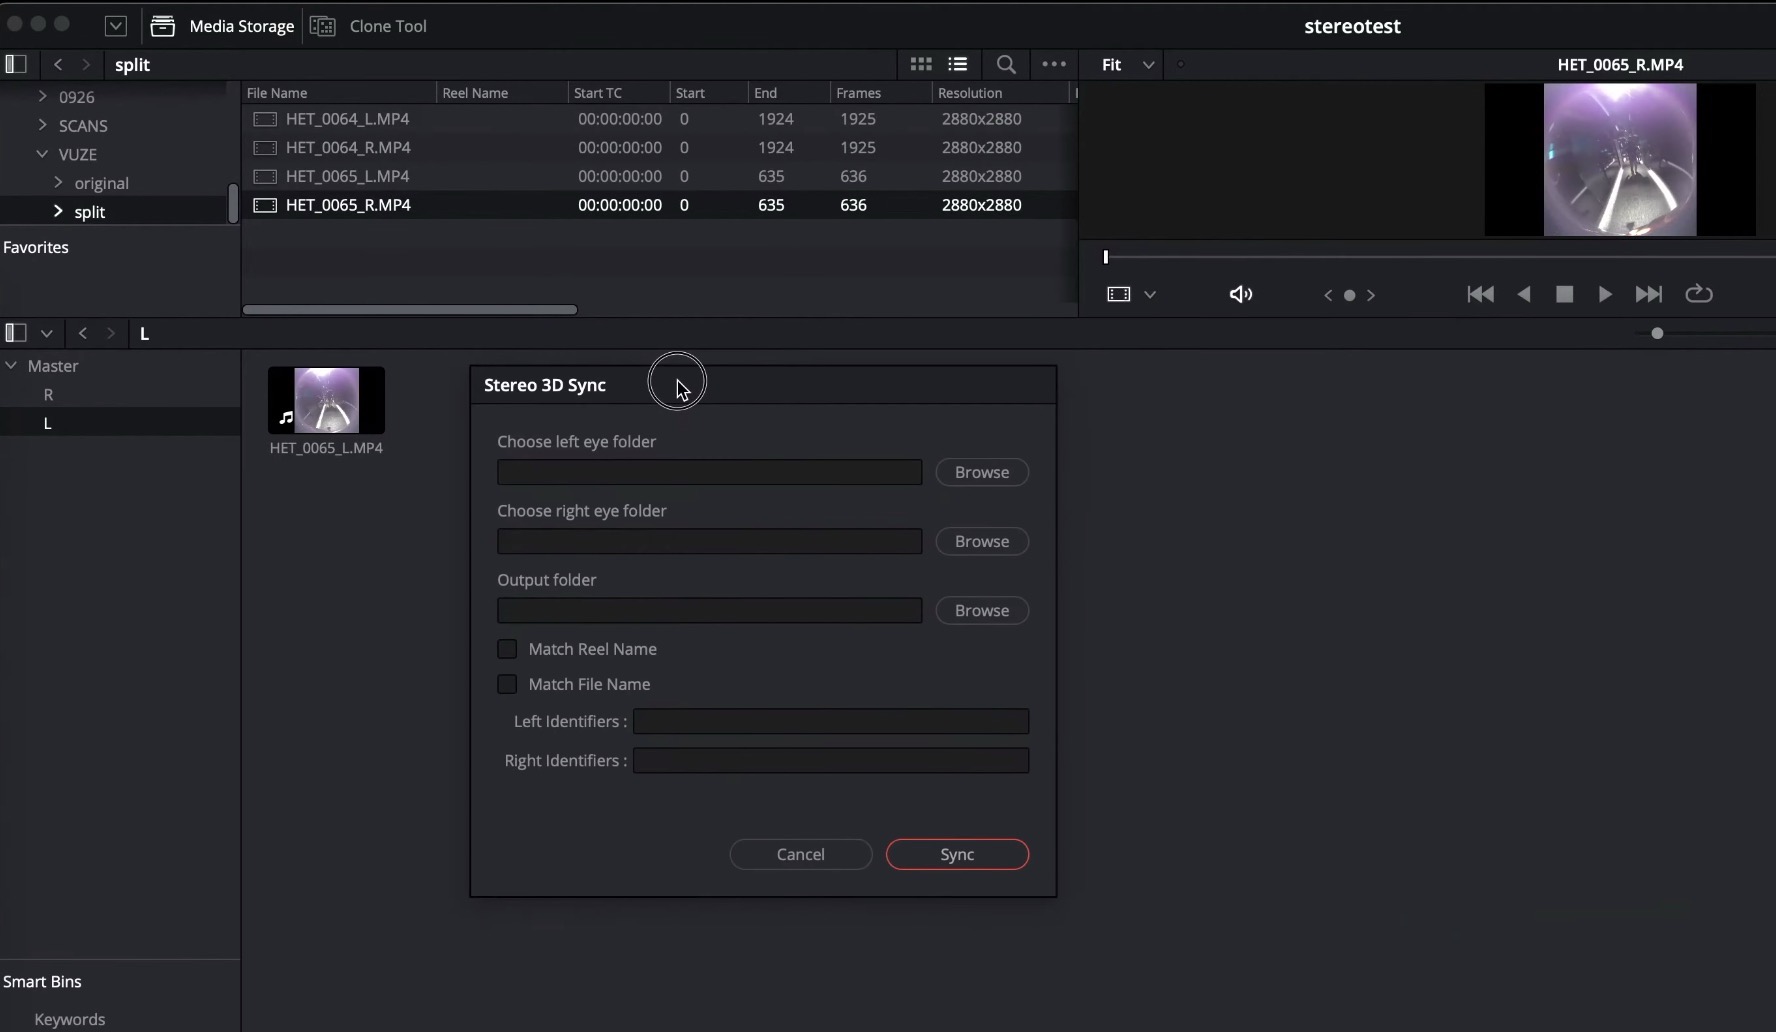
    E["Run Stereo 3D Sync<br/>Choose L bin, R bin, and output bin"]
    F["Match file names<br/>Create synchronized stereo clips"]
    G["Build a stereo timeline<br/>Edit like a normal 2D sequence"]
    H["Open Color page stereo controls<br/>Select monitoring mode"]
    I["Check depth and eye order<br/>Mono, stereo, or anaglyph preview"]
    J["Open Deliver page<br/>Enable Render Stereoscopic 3D"]
    K{"Choose delivery layout"}
    L["Side by side"]
    M["Top and bottom"]
    N["Anaglyph or single eye"]
    O["Render and inspect<br/>the final stereo master"]

    A --> B --> C --> D --> E --> F --> G --> H --> I --> J --> K
    K --> L --> O
    K --> M --> O
    K --> N --> O

    classDef source fill:#eef4ff,stroke:#3b82f6,color:#172033,stroke-width:1.5px;
    classDef assemble fill:#f3f0ff,stroke:#7950f2,color:#241d3a,stroke-width:1.5px;
    classDef edit fill:#ecfdf3,stroke:#2f9e44,color:#17351f,stroke-width:1.5px;
    classDef monitor fill:#fff7e6,stroke:#f08c00,color:#422b08,stroke-width:1.5px;
    classDef deliver fill:#fff0f3,stroke:#e64980,color:#46182a,stroke-width:1.5px;
    classDef decision fill:#ffffff,stroke:#495057,color:#212529,stroke-width:2px;

    class A,B source;
    class C,D,E,F assemble;
    class G edit;
    class H,I monitor;
    class J,L,M,N,O deliver;
    class K decision;
Stereoscopic Workflow in DaVinci Resolve
Assemble, edit, monitor, and render paired left- and right-eye footage
Stereo3D
A practical workflow for synchronizing and editing stereoscopic 3D video in DaVinci Resolve.
Keywords
DaVinci Resolve, stereoscopic editing, stereo 3D, side by side, anaglyph, left eye, right eye
Video tutorial
This workflow is based on the 3D Film Lab tutorial Basic Stereo 3D Workflow in DaVinci Resolve (Assemble, Edit, Render). It demonstrates how paired left- and right-eye recordings become synchronized stereo clips that can be edited almost like conventional 2D media.
Workflow at a glance
1. Prepare the stereo sources
Stereoscopic production normally creates two recordings of the same action: one for the left eye and one for the right eye. The tutorial uses two Blackmagic cameras, but the same principle applies to any synchronized stereo pair.
Use a consistent filename convention before importing the material:
scene-001-L.mov
scene-001-R.mov
scene-002-L.mov
scene-002-R.mov
The eye suffix gives DaVinci Resolve a useful clue when matching each left-eye clip with its corresponding right-eye clip.
TipKeep both eyes technically identical
Left and right clips should use the same frame rate, resolution, codec, duration, and time base. Differences between the eyes make synchronization and comfortable stereo viewing more difficult.
2. Organize the Media Pool
Open the Media page and create two bins:
Lfor left-eye clipsRfor right-eye clips
Use the search field to isolate filenames ending in L or R, then place the files into the appropriate bins. If Resolve asks to adapt the project frame rate to the imported media, confirm the change when that rate matches the intended production format.
At this stage, keep the original eye clips separated. The next operation will combine each synchronized pair into a single stereo media item.
3. Create synchronized stereo clips
Select the source material and open the contextual Stereo 3D Sync command. In the synchronization dialog:
- Choose the left-eye bin.
- Choose the right-eye bin.
- Select an output bin, such as the master or source level.
- Enable filename matching when the
LandRnaming convention is consistent. - Run the synchronization.
Resolve creates new stereo clips in the selected output bin. These clips carry a small 3D indicator. The original media may no longer appear where expected if the chosen destination is a different bin, so check the output location before assuming that clips were removed.
ImportantVerify the pairing
Before editing, confirm that every generated stereo clip contains the correct left and right views. A technically synchronized but incorrectly paired clip can be difficult to identify later in a long timeline.
4. Edit the stereo timeline
Add a synchronized stereo clip to a new timeline. Resolve recognizes the media as stereoscopic and makes the timeline stereo automatically.
From this point, the editorial process is intentionally familiar:
- set source in and out points
- append or insert clips
- trim edits
- arrange the sequence
- work with the combined stereo clips as normal timeline items
The editor does not need to maintain two manually stacked video tracks for every shot. Resolve keeps the eye pair inside each stereo clip.
5. Configure stereo monitoring
Open the Color page and select the stereo 3D controls using the 3D icon near the bottom of the interface.
The stereo panel controls both what is displayed and how it is displayed:
- Mono shows one eye for ordinary inspection.
- Stereo displays the paired views through the selected monitoring method.
- Anaglyph overlays the eyes for viewing with red/cyan glasses.
The viewer, scopes, and external video output can use different stereo display settings. An external stereoscopic display may require suitable video-output hardware, such as an UltraStudio device, between Resolve and the display or projector.
WarningMonitoring is part of quality control
Do not judge stereo only from a single-eye preview. Check eye order, vertical alignment, synchronization, disparity, and viewing comfort in an actual stereo display mode.
6. Render the stereoscopic master
Move to the Deliver page and configure the normal filename, destination, codec, resolution, and frame-rate settings. Then locate the stereoscopic options and enable Render Stereoscopic 3D.
Resolve can deliver several layouts:
| Layout | Typical use |
|---|---|
| Side by side | Frame-compatible delivery, television, and review files |
| Top and bottom | Frame-compatible delivery with vertically arranged eyes |
| Anaglyph | Simple preview with red/cyan glasses |
| Left eye only | Monoscopic review or diagnostic export |
| Right eye only | Monoscopic review or diagnostic export |
For a side-by-side output, select both eyes and place the left view on the left side of the combined frame. Add the job to the render queue, render it, and inspect the resulting file to confirm the layout and eye order.
Final checklist
- Left and right sources use matching technical settings.
- Filenames identify the eye consistently.
- Eye clips are organized into separate bins.
- Stereo 3D Sync produces the expected pairs.
- Generated clips display the 3D indicator.
- The timeline is monitored in an appropriate stereo mode.
- Eye order, alignment, and depth are checked before delivery.
- The rendered layout matches the target platform.
- The final file is reviewed after rendering.
Source
This article is derived from the public auto-generated transcript and demonstrated interface steps in the 3D Film Lab video, published 9 October 2024. Automatic transcript wording was corrected and reorganized into a written production workflow.