Rendering Full-Parallax Hologram Views in Blender
Combining a horizontal camera orbit with Python-controlled vertical sampling
Blender, Python, full parallax, hologram, hogel, camera array, USD
1 From one orbit to a full-parallax view set
A horizontal camera orbit produces horizontal parallax: the subject changes as the viewer moves left and right. A full-parallax hologram also needs vertical view changes. This project combines both dimensions without manually building thousands of cameras.
The Blender animation supplies the horizontal samples. A Python loop raises the complete camera track, renders the animation again, and stores every vertical row separately. The result is a rectangular matrix of viewpoints suitable for holographic processing.
This workflow was developed for the full-parallax portrait research published as Holography in Your Pocket (Hamacher and Gentet 2025) and builds on the camera and viewing-geometry experiments reported in Evaluation of Stereoscopy in Digital Holography (Hamacher 2022). The corresponding website articles provide the portrait-production context and the stereoscopic evaluation context.
2 The Blender camera rig
The supplied scene contains four important elements:
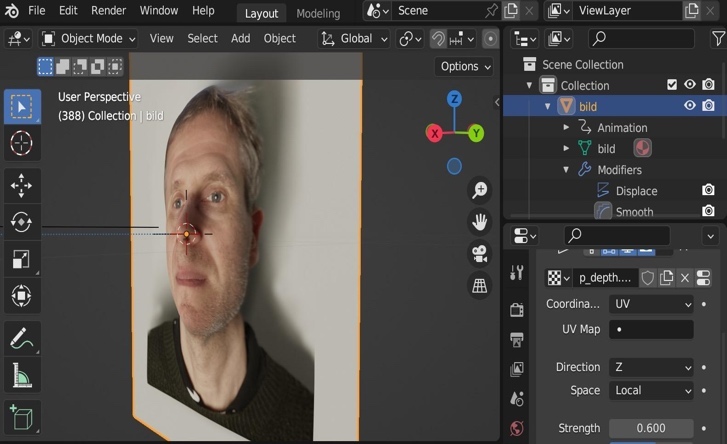
bild: the depth-derived portrait geometry and image texture;CameraTrack: a circular Bézier track around the portrait;Camera: the camera following that track;CameraTarget: an empty object at the centre that keeps the camera aimed at the subject.
The exported USDC contains 120 frames at 24 fps. During the animated part, the track rotates through approximately 50 degrees. At every frame, the camera occupies a new horizontal viewpoint while continuing to face CameraTarget.
2.1 Camera-path demonstration
The five-second render below shows the complete 120-frame horizontal pass. The portrait remains fixed while the virtual camera travels around it. Because the camera continuously targets the empty object at the centre, the optical axis turns with the orbit and keeps the portrait framed throughout the movement.
3 Two sampling dimensions
If the animation has (F) frames and the script renders (R) vertical rows, the total number of images is
\[N=R\times F.\]
For 156 rows and 120 frames, the render produces 18,720 images. Each output folder is a vertical position; each numbered PNG inside it is a horizontal viewpoint.
3.1 Previewing the vertical coverage
The STEP parameter provides a fast spatial preview. It changes the increment used by range() while leaving the 156-row height calculation untouched:
STEP = 20This renders 8 representative rows—001, 021, 041, 061, 081, 101, 121, and 141—or 960 images when the orbit contains 120 frames. The large gaps make it easy to inspect the upper, central, and lower camera positions, framing, target tracking, and visibility before committing to all 18,720 files.
After the preview, returning to STEP = 1 fills every production row. Existing preview folders already correspond to valid final positions and do not need to be renamed.
render/
├── 001/HogelOut001.png ... HogelOut120.png
├── 002/HogelOut001.png ... HogelOut120.png
⋮
└── 156/HogelOut001.png ... HogelOut120.png
4 The annotated Blender script
The cleaned version below preserves the original method while naming the rig explicitly and ensuring that the first and last rows reach both limits.
import bpy
from pathlib import Path

1TOP = 0.50
2BOTTOM = -0.20
3ROWS = 156
START_ROW = 1
4END_ROW = ROWS
5RIG_NAME = "CameraTrack"

6rig = bpy.data.objects.get(RIG_NAME)
if rig is None:
    raise RuntimeError(f'Object "{RIG_NAME}" was not found')

7render_root = Path(bpy.path.abspath("//render"))
8interval = (TOP - BOTTOM) / (ROWS - 1)
9STEP = 1

10for row in range(START_ROW, END_ROW + 1, STEP):
11    height = TOP - (row - 1) * interval
12    rig.location.z = height

13    row_dir = render_root / f"{row:03d}"
    row_dir.mkdir(parents=True, exist_ok=True)
    bpy.context.scene.render.filepath = str(
14        row_dir / "HogelOut###.png"
    )

    print(f"Rendering row {row}/{ROWS}: z={height:.4f} m")
15 bpy.ops.render.render(animation=True)- 1
-
Top of the vertical viewing range.
TOPis the highest position reached by the camera track. Blender measures this scene in metres, so0.50means the orbit is positioned 50 cm above the scene origin. - 2
-
Bottom of the vertical viewing range. A value of
-0.20places the final orbit 20 cm below the origin. Together,TOPandBOTTOMdefine a 70 cm vertical sampling range. - 3
- Number of vertical viewpoints. The script divides that range into 156 reproducible camera-track positions. This is the vertical dimension of the final view matrix—not the number of frames in the Blender animation.
- 4
-
Restart control. A long render can be divided into several jobs or resumed after a failure. For example, setting
START_ROW = 81andEND_ROW = 120renders only that section without repeating rows 1–80. - 5
-
The object that carries the orbit.
CameraTrackis the circular path on which the camera moves horizontally. Raising this object raises the complete horizontal orbit while the portrait remains stationary. - 6
- Safe scene lookup. Blender returns the scene object with the requested name. If it has been renamed or deleted, the script stops immediately instead of silently rendering every row from the wrong position.
- 7
-
Output beside the Blender project. Blender’s
//prefix means “relative to the saved.blendfile.” The result therefore goes into a predictablerenderfolder even when Blender was launched from another directory. - 8
-
Exact vertical spacing. There are 155 intervals between 156 sample positions. Dividing by
ROWS - 1ensures that row 1 reaches exactlyTOPand row 156 reaches exactlyBOTTOM. - 9
-
Preview sampling without changing the final grid.
STEP = 1renders all 156 rows. SettingSTEP = 20renders rows1, 21, 41, …, 141. These are not newly redistributed preview positions: they retain their exact heights and folder numbers from the final production grid, making the preview directly comparable to the complete render. - 10
-
One loop pass equals one selected vertical row. The inclusive upper bound requires
END_ROW + 1because Python’srange()stops before its final argument. - 11
- Row number becomes physical height. Subtracting successive intervals moves from the upper position downward. The same row number will always reproduce the same height.
- 12
-
Move the track, not the target. Changing only the track’s Z coordinate raises the orbiting camera.
CameraTargetstays at the portrait centre, so the camera tilts appropriately and continues looking at the subject from every elevated or lowered orbit. - 13
-
One directory per vertical position. Formatting with
:03dcreates001,002, …156. Fixed-width names sort correctly in file browsers and preserve the row order expected by later holographic processing. - 14
-
One file per horizontal viewpoint. Blender replaces
###with the animation frame number. Row042, frame073therefore becomesrender/042/HogelOut073.png. - 15
-
Render the complete horizontal orbit.
animation=Truerenders every configured animation frame at the current track height. When it finishes, the loop moves to the next vertical row and renders that same orbit again.
Start with 4 rows and 12 animation frames. Confirm camera direction, output naming, transparency, colour management, and storage before enabling the full production range.
5 Source scene and USD export
The complete, versioned research-software package is archived on Zenodo as Full-Parallax Hologram Rendering for Blender, version 1.0.0. When using the software or supplied scene assets, cite the archived release with DOI 10.5281/zenodo.21741952.
The Blender scene is the editable source. The USDC is an animated binary USD crate containing the camera track, camera, target, portrait mesh, material, lighting, and 120-frame animation. Because the USDC references external files, its textures directory must remain beside it.
files/
├── philippe04.blend
├── philippe04anim.usdc
├── holoscript.py
└── textures/
    ├── bild_ext.png
    └── color_817D70.exr
6 What the automation contributes
The important idea is not simply batch rendering. The script converts a one-dimensional animated camera path into a two-dimensional sampling system. Blender provides the scene, constraints, target tracking, and horizontal orbit; Python supplies repeatable vertical placement, directory organization, restart control, and unattended production.