Making 3DGS on Apple Silicon
An open COLMAP-to-Brush workflow for Gaussian splats on macOS
Apple Silicon, macOS, 3DGS, Gaussian splats, COLMAP, COLMAP Gradio, Brush, WebGPU
Why this pipeline matters
Many early 3D Gaussian Splatting implementations assume an NVIDIA GPU and CUDA. Apple Silicon uses a different GPU architecture, so copying a CUDA tutorial directly onto a Mac normally fails before training begins.
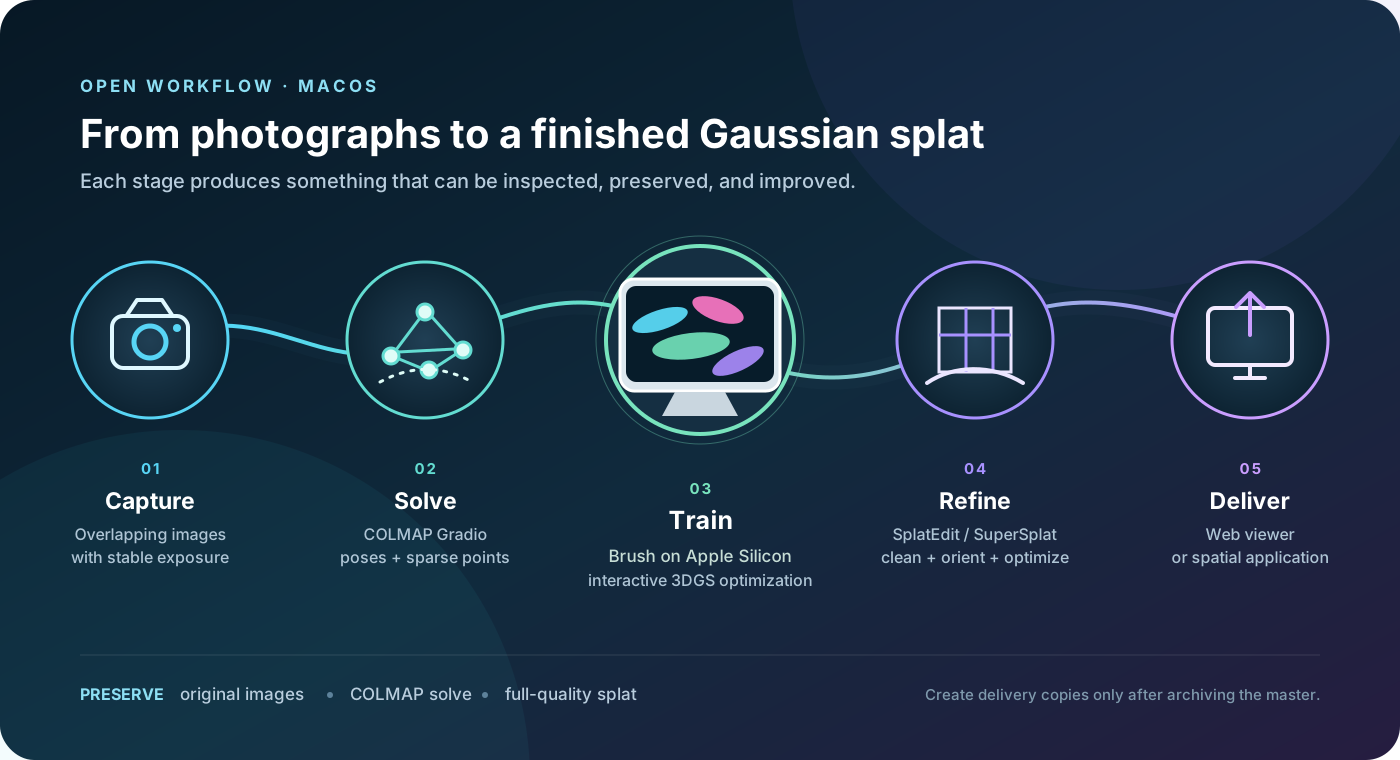
An open Mac workflow is nevertheless possible by giving two applications separate responsibilities:
- COLMAP Gradio prepares the photographs and solves the cameras.
- Brush reads the COLMAP dataset and trains the splat with a cross-platform, WebGPU-compatible reconstruction engine.
What the two stages produce
COLMAP performs structure from motion. It identifies matching visual features across photographs and estimates where each camera was located. The result is a sparse geometric scaffold, not yet the final photorealistic scene.
Brush uses the photographs and solved cameras to optimize many oriented, semi-transparent Gaussians. Their projected color and opacity are adjusted until the rendered views reproduce the input photography.
When training fails, first inspect the COLMAP solve. A splat trainer cannot repair missing cameras, incorrect camera poses, severe blur, or a capture with insufficient overlap.
1. Capture the source images
Choose a static subject or location for the first test.
- Lock exposure, white balance, and focus if possible.
- Move slowly and maintain strong overlap between neighboring views.
- Record several heights and angles, not only one horizontal circle.
- Avoid moving people, moving shadows, mirrors, and large transparent areas.
- Prefer sharp still photographs; video frames are convenient but often more compressed and blurred.
Create a workspace with this structure:
my-splat/
└── images/
    ├── frame_0001.jpg
    ├── frame_0002.jpg
    ├── frame_0003.jpg
    └── …
Use a simple path without unusual punctuation while testing the workflow.
2. Install the preparation tools
Install Homebrew if it is not already present, then install COLMAP and ImageMagick as documented by COLMAP Gradio:
brew install colmap
brew install imagemagick
Install Miniconda and create the environment used by the interface:
conda create --name colmap_env python=3.9 --no-default-packages -y
conda activate colmap_env
Clone and prepare COLMAP Gradio:
git clone https://github.com/jonstephens85/colmap-gradio.git
cd colmap-gradio
pip install gradio==4.43.0
3. Solve the cameras with COLMAP Gradio
Start the local interface:
conda activate colmap_env
cd colmap-gradio
python colmap_gradio.py
Open http://127.0.0.1:7860/ in the browser and enter the path to my-splat— the parent directory containing images.
Choose scaling deliberately
Large images require more processing time and memory. The Gradio interface can downscale them. When scaling is enabled, it renames the original directory to images_original and writes resized copies into a new images directory.
For the first test, moderate image dimensions make iteration faster. Preserve the originals so the solve can later be repeated at higher quality.
Choose the matcher
- Sequential: appropriate for ordered frames from a continuous video or a systematic photographic path.
- Exhaustive: compares the set more broadly and suits smaller unordered collections, but costs more processing time.
- Spatial: intended for geotagged imagery.
After successful processing, the workspace should contain:
my-splat/
├── images/
├── images_original/       # only when scaling was used
├── database.db
└── sparse/
    └── 0/
        ├── cameras.bin
        ├── images.bin
        └── points3D.bin
These three binary files describe the calibrated cameras, registered images, and sparse reconstruction expected by the next stage.
4. Inspect the COLMAP solve
Do not begin a long training run blindly. Check that:
- most source photographs were registered;
- the cameras form a plausible path around or through the scene;
- the sparse points resemble the captured space;
- there are no detached groups or obviously misplaced cameras.
If only a small fraction of images registered, improve image overlap, remove blurred frames, try a more suitable matcher, or reduce repeated and featureless imagery before rerunning COLMAP.
5. Build and run Brush on macOS
Brush is written in Rust. Its repository currently documents Rust 1.88 or newer for source builds. Install the Rust toolchain from rustup.rs, then clone Brush:
git clone https://github.com/ArthurBrussee/brush.git
cd brush
cargo run --release
The first optimized build can take time because Cargo must download and compile the dependencies. Later launches reuse the compiled build.
Open the COLMAP workspace prepared in the previous stage. Brush accepts COLMAP data and Nerfstudio-format datasets and allows the reconstruction to remain interactive while training.
cargo run --release enables compiler optimizations. A debug build is useful for development, but it is not representative of training or rendering performance.
6. Train and evaluate the splat
During training, compare novel views with the original camera views. Look for:
- sharp detail close to the captured camera path;
- stable edges when the viewpoint moves;
- gaps caused by missing coverage;
- floating Gaussians around moving or reflective objects;
- large soft regions caused by blur or weak camera calibration.
A visually attractive view from one camera is not enough. Navigate around the scene and test positions between the original photographs. Stop and correct the dataset if the camera solve is structurally wrong; additional training will not fix incorrect input geometry.
Brush also supports masks. Transparent input images can constrain the final alpha, while a masks directory can mark image regions that training should ignore.
7. Export a master and clean it
Save a full-quality reconstruction before reducing it for delivery. Then open an exported splat in one of the editors described in Open Tools for Gaussian Splats:
- SplatEdit for extended selection, densification, grid division, proxy generation, projection, and conversion tools;
- SuperSplat for cleanup, transforms, appearance, camera animation, optimization, and browser publishing.
Remove floaters from several viewpoints, establish the correct up direction, crop unused space, and verify scale before making a compressed copy.
8. Deliver for the intended display
Keep at least three layers of the project:
- Source: original photographs or video.
- Reconstruction master: COLMAP solve and full-quality splat.
- Delivery copy: compressed or converted for a particular viewer.
For web delivery, use a viewer-oriented compressed format or a self-hosted package rather than sending the archival PLY directly. For Apple Vision Pro, consult Apple’s Gaussian splats on visionOS workflow and the USDZ concept page.